Advanced Interactive Design - Lectures & Exercises
25.04.2024 - 02.08.2024 / Week 1 - Week 14
Lim Rui Ying / 0358986Advanced Interactive Design / Bachelor of Design (Hons) in Creative Media
Lectures & Exercises
CONTENT
Exercises
LECTURES
WEEK 1 | Module Briefing
We were given a module briefing on the lectures and tasks in this module. Mr
Razif gave us an idea of the interactive website by browsing through
existing websites on FWA.
Interactive websites engage users actively by allowing them to
participate, explore and interact with the content in various ways. These
websites usually incorporate
lots of visual feedback and interesting transitions and animations.
WEEK 2 | Web Animation Fundamentals
We learnt about the principles of web animations from Interactive Design
Foundation and Adobe.
WEEK 6 | Planning & Storyboarding
Why do we need storyboard?
- Convey our design vision clearly
- Provide an in-depth blue print to our design
- Ensuring that our vision are not misinterpreted
- Animation is a moving pictures. One screenshot alone will not tell the whole story
Storyboarding the animations we intend to create:
- Providing detailed descriptions for the animations.
- Demonstrating the movement of the animations visually.
- Creating sample animations as closely resembling the final animations as possible.
INSTRUCTIONS
EXERCISES
WEEK 2 | Animating basic shapes and objects
During week 2 class, Mr Razif gave us tutorials on Adobe Animate, creating
basic animations.
Document Settings
Size: HD/Full HD
Platform type: HTML5 Canvas (ActionScript 3.0 no longer supported on
browsers)
Objects to be animated have to be a symbol
- Types of symbols: Graphic, Movie Clip, Button
[left click] Select the object to animate → [right click] Convert to
Symbol
Symbol Settings: Rename, [Type] Movie Clip, [Registration] Center

|
| Fig. 1.1 Symbol settings |
Classic Tween
- Auto animate objects between keyframes
- Suitable for loading animation

|
| Fig. 1.2 Applying Classic Tween |
Insert a Keyframe to the timeline at a certain keyframe [2s] → [at the
2s keyframe] Move the symbol → [left click] Select anywhere on the
previous keyframe → [right click] Create Classic Tween

|
| Fig. 1.3 Animation Outcome (Classic Tween) |
Motion Tween
- Can design the animation path of the symbol

|
| Fig. 1.4 Applying Motion Tween |
Insert Frame to the timeline → [at a keyframe] Move the symbol → [left
click] Select anywhere on the previous keyframe → [right click] Create
Motion Tween
- Move the symbol around and edit the motion path

|
| Fig. 1.5 Animation outcome (Motion Tween) |
Shape Tween
- No need to convert to a symbol
- E.g. change from a square to a triangle
- Suitable to create morph effects (e.g. pop-up window, navigation)

|
| Fig. 1.6 Applying Shape Tween |
Create a square → Insert a Keyframe → [at the keyframe, delete the
square] Insert a triangle → Select anywhere on the previous
keyframe → [right click] Create Shape Tween

|
| Fig. 1.7 Animation outcome (Shape Tween) |
Multiple Animations - use Layers
- Each document only has one timeline, everything moves at the same time
- Two or more objects can move at different speeds, directions, etc to
create more dynamic animations

|
| Fig. 1.8 Using different layers to animate different objects |
Dynamic Animation - Easing and Colour Effects
Easing
Select anywhere on the tweening timeline → Properties - Frame -
Tweening - Ease
- Play around with the effect and rotation (clockwise, counterclockwise)
Colour effects
Select keyframe → select symbol → Properties - Object - Colour
Effects → choose Alpha → adjust the percentage

|
| Fig. 1.9 Dynamic animation outcome |
WEEK 3
Recap Exercise
Before learning new Adobe Animate techniques, we went through a small
exercise to recap last week's tutorials.
Instructions:
1. Create a circle
2. Make it move from the top left of your scene to the top right of your
scene, for 1 second
3. Make it move from top right to bottom right for 2 seconds
4. Move from bottom right to bottom left for 1 second
5. Move from bottom left to top left for 2 second
6. Move to the centre of the stage/screen for 1 second
7. Pause for 1 second
8. Expand/Enlarge/Scale to fill the whole screen
9. Pause for 1 second
10. Scale it back down to the original size
11. Morph to a rabbit bounce twice and then jump off the screen

|
| Fig. 2.1 Final outcome of recap exercise |
This recap exercise applies the three Tweening techniques we learned last
week. One new thing that we learned is Break Apart, which is to
change a symbol back to a shape.
Bouncing Effect
- Applies Classic Tween and Easings
- To create a more dynamic animation, add more keyframes between the
ball's descent and its rebound to achieve a squeeze effect

|
| Fig. 2.2 Additional keyframes to create a squeeze effect |

|
| Fig. 2.3 Final outcome of a bouncing ball |
Applying Multiple Animations
- Create a new symbol at the first keyframe on the main scene
- In the new symbol and on the main scene, you can create animations
- Both animations will combine together

|
| Fig. 2.4 Creating a new symbol at the first keyframe on Scene 1 |
Cut frames → click on the first keyframe in Scene 1 → Insert - New
Symbol → [right click on the first keyframe] paste frames
Then, drag the previous ball movie clip into the scene and create an animation where the ball moves from left to right.

|
| Fig. 2.5 Applying Classic Tween to the ball in Scene 1 |
The final outcome shows the combined animations in the symbol and in the
main scene.

|
| Fig. 2.6 Final outcome of multiple animations |
Animating Logo
First, we have to import the logo file into Animate. Before animating, we
have to ensure the layers are grouped and named properly. To animate the
logo, convert each layer into a movie clip.

|
| Fig. 2.7 Converting layers into movie clips |
Next, we animated the movie clips separately, so they enter the scene at different times. We also added easings (Cubic Ease-out) and rotation to the movie clips to create a smoother animation.

|
| Fig. 2.8 Animating each movie clip in different sequences |
|
|
| Fig. 2.9 Final outcome of animated logo |
WEEK 4 | Screen Navigation
During week 4 class, we learned about stop animation and screen navigation
using simple scripts in Animate. These techniques are applicable for
navigating between different pages on our websites.
This week's tutorial covered:
- Stop the animation
- Create nested animations
- Center the scene
- Create the second screen
- Add label names
- Create buttons
- Add action scripts for screen navigation
Stop the animation
First, we created a simple logo animation using a circle. By default, the
circle animation loops continuously, but on our website, we would want the
logo to animate only once and then stop.
To stop the animation, we had to create a new layer and named it
"Script". On the "Script" layer, we applied a script to the keyframe
where we wanted the circle animation to stop after expanding to fill the
full screen.

|
| Fig. 3.1 Create a new layer, named it "Script" |

|
| Fig. 3.2 Type the script "this.stop();" |
[Right click on the keyframe] Actions → type "this.stop();"
Video 1: Outcome of animation stop on the circle
Next, we created a rectangle and converted it to a movie clip symbol
named "mc_panel1" on the main scene and set it to transparent. Within
this symbol, we converted the rectangle again to a movie clip symbol
named "mc_panel_1", and then created two more movie clip symbols named
"mc_panel_2" and "mc_panel_3".

|
|
Fig. 3.3 Converting the rectangle into a symbol "mc_panel1" |

|
| Fig. 3.4 Creating three symbols (mc_panel_1, mc_panel_2, mc_panel_3) within "mc_panel1" |
Then, we animated the panels in different sequences. At the last
keyframe of the animations, we added an Actions script to stop the
panel animations. The panel animations are now nested within the
symbol "mc_panel1" on the main scene.
Video 2: Outcome of panel animations
Center the screen
In the Publish Settings, check the options "Center stage" and "Make
responsive". Under "Make responsive", check the option "Scale to fill
visible area" and select "Fit in view".

|
| Fig. 3.5 Publish Settings |
Other settings to note:
- Preloader: can upload a loading animation for the loading page
- Export image assets: select Export as: Image assets
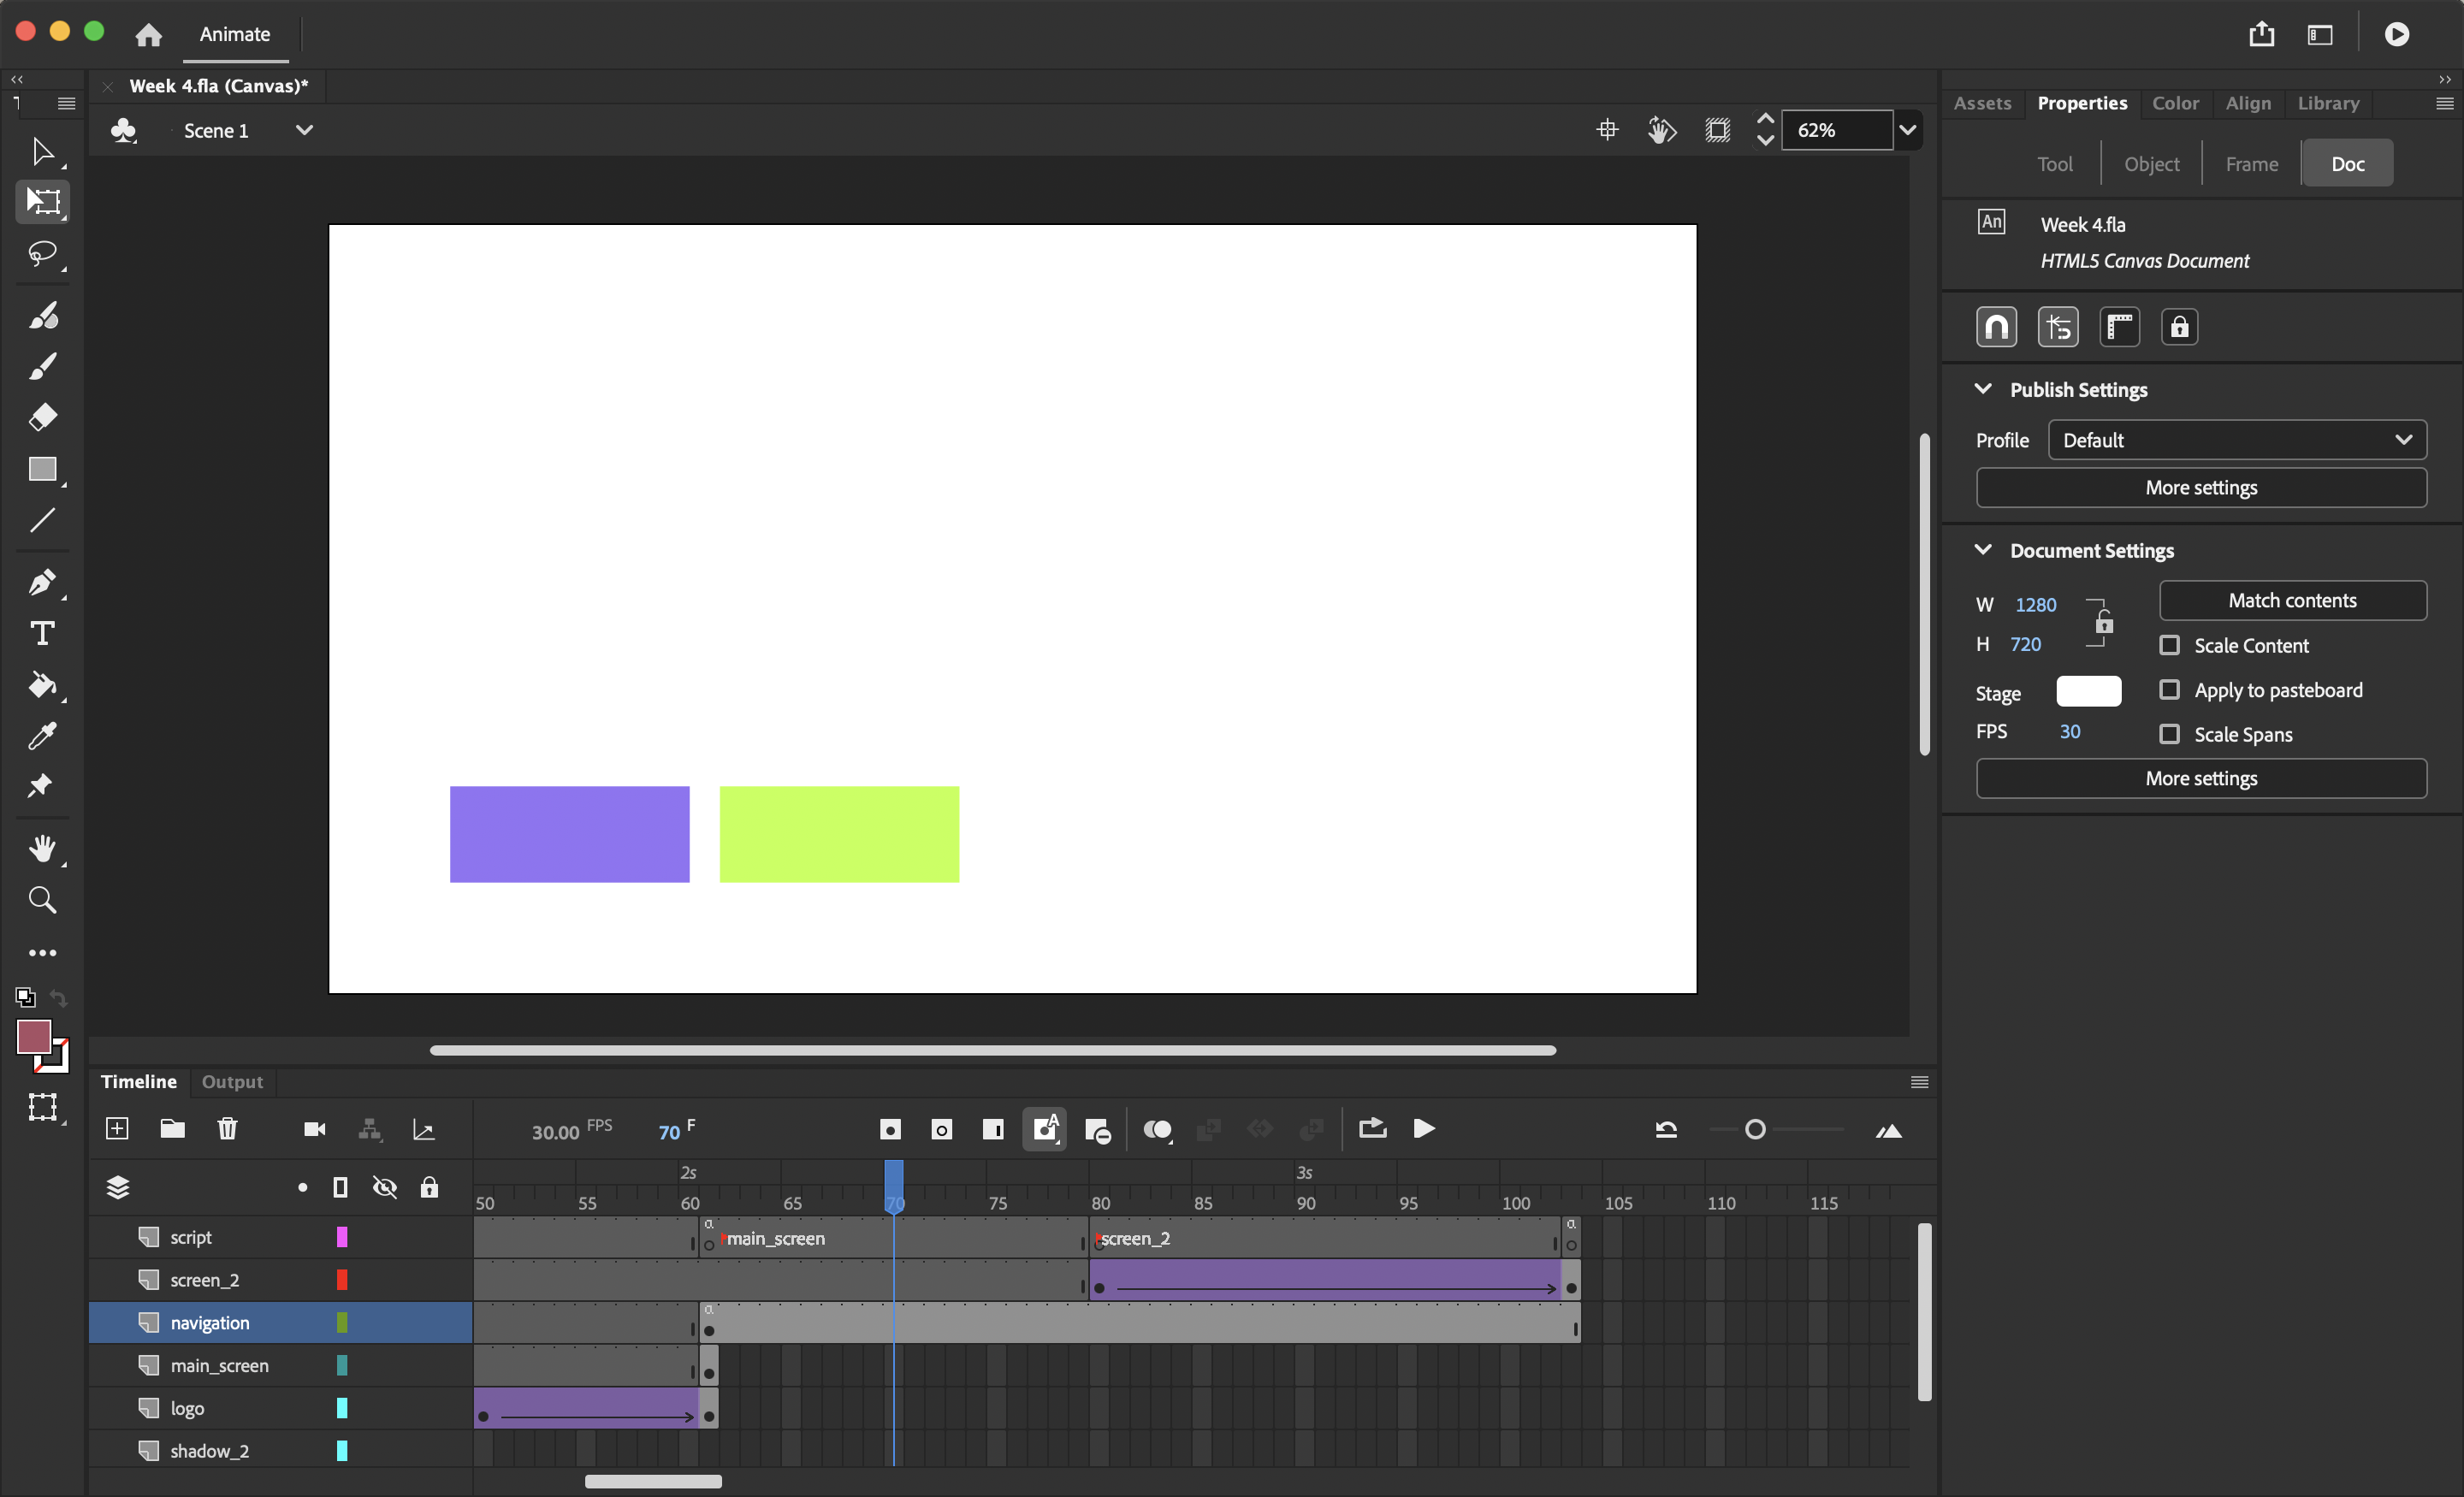
Create the second screen
Create a new layer and name it "Screen_2". After the keyframe where
the main screen animations end, create a square and animate it. Also,
apply the stop animation script to the keyframe where the second
screen animation ends within the "Script" layer.

|
| Fig. 3.6 Creating the second screen and animations |
Add label names
On the Script layer, add a keyframe at the starting point of the
main screen and name the label "main_screen". Follow the same steps
for the second screen by adding a keyframe at its starting point and
naming the label "screen_2". Adding these label names allows adding
scripts for screen navigation.

|
| Fig. 3.7 Adding the label names |
Create buttons
Create two rectangles within a new layer named "Navigation". Next,
convert the rectangles into button symbols. A Button Symbol is
suitable for buttons with immediate changes on hover and click
animations. For more dynamic animations on the buttons such as morph
effects, select the movie clip symbol.

|
| Fig. 3.8 Button symbol |
|
| Fig. 3.9 Creating two buttons for navigation |
Anything we want to control and add an Actions script to must have
an instance name. Therefore, name the left button "btn_1" and the
right button "btn_2".

|
| Fig. 3.10 Instance name |
Buttons states:
- Up: default state
- Over: hover state
- Down: mouse click state
- Hit: button active area
We can change the colour of the button states to indicate changes for
users.

|
| Fig. 3.11 Adding different states to the button |
Video 3: Outcome of different button states
Add action scripts for screen navigation
To go to a different frame, we have to add action scripts to the buttons:
- Select the button you want to add the Actions script to
- Right-click on the keyframe and select "Actions"
- Select "Add using wizard"
- Choose "Go to frame label and Play" and "This timeline"
- Type "screen_2" (the screen you want to navigate to)
- Select "On Mouse Click" (action to trigger the event)
- Select "btn_2" (object to trigger, instance names will show here)

|
|
Fig. 3.12 Step 4: Choose "Go to frame label and Play" and
"This timeline" Step 5: Type "screen_2" |

|
|
Fig. 3.13 Step 6: Select "On Mouse Click" Step 7: Select "btn_2" |
Apply the same steps to the right button. Type "main_screen" and select
"btn_1" to create the functionality of navigating to the main screen.

|
| Fig. 3.14 Scripts applied to the buttons |
Video 4: Final outcome of Screen Navigation
WEEK 5 | Masking
Recap exercise
Last week, we learned about screen navigation. To achieve this, we have to partition the timeline to represent different pages.
First, create two layers named "Label" and "Pages" respectively. Then, divide the timeline into three sections on the "Label" and "Pages" layers. On each page, create a text and animate it. Add a stop animation script at the last keyframe of each page.
For the font, choose "Dynamic Text" to use Adobe/Google fonts since we will publish our website online.
 |
| Fig. 4.1 Select "Dynamic Text" |
 |
| Fig. 4.2 Adding web fonts |
Moving forward, we added three buttons on a new layer named "Navigation". Then, we applied scripts to each button to navigate to each page respectively. One thing to note is that everything we want to control using the scripts should have an instance name, and each instance name must be unique.
 |
| Fig. 4.3 Button scripts |
Video 5: Final outcome of recap exercise
Masking
This week, we learned about masking in Animate CC. First, we imported an image and added text in front of it. Then, we right-clicked on the text layer and selected the option to mask the image.
 |
| Fig. 4.4 Adding a text |
 |
| Fig. 4.5 Mask the image |
 |
| Fig. Adding animations to the text |
 |
| Fig. 4.6 Final outcome of masking |
Exercise
For the masking exercise, we need to create an animation where two men are involved. One man should appear inside the house, while the other should be outside the window. Both men will move in and out of their respective positions.
 |
| Fig. 4.7 Masking exercise |
I created the mask for the man outside the window using rectangles. Then, I added animations to both men.
 |
| Fig. 4.8 Creating the mask and animations |
 |
| Fig. 4.9 Final outcome of masking exercise |
WEEK 9 | Scripting using GSAP
add GSAP cdn to Animate script
https://gsap.com/docs/v3/Installation/?tab=cdn&module=esm&method=private+registry&tier=free&club=false&require=false&trial=true
GSAP
gsapto
gsapfrom
- Tween
- Easing
Move around the image using buttons
WEEK 10 |
WEEK 11 | Button States Animation
This week, we learned about creating hover animations. First, we created a button and converted it to a symbol named “mc_btn.” We also set the instance name to match, ensuring it was also “mc_btn.”
 |
| Fig. Create a button and convert it to a symbol |
In the button symbol, we created the outline animation for the mouse-over effect. Then, we duplicated the frames and reversed them to create the mouse-out effect. We labelled the button states as “default,” “hover,” and “out” to ensure each state plays the correct animation.
 |
| Fig. Create hover animation |
Next, we applied scripts to the button.


Comments
Post a Comment