Video and Sound Production - Exercises
04.04.2023 - 30.05.2023 / Week 1 - Week 9
Lim Rui Ying / 0358986
Video
and Sound Production / Bachelor of Design (Hons) in Creative Media
Exercises
LIST
Exercises
Week 3: 3-Act Structure Exercises
Week 4: Colour Correction
Week 9 - Week 10: Stop Motion
LECTURES
WEEK 1 | Module Briefing
Mr Martin briefed us on this module and the projects we will do throughout
this semester. Mr Martin also introduced three phases of doing a time base
project which we will go through in the upcoming projects:
Pre-production - Idea development, Story, Storyboard, Visual references,
Location/Props
Production - Lightning, Costume, Principal shooting
Post-production - Offline editing, Online editing, Audio editing
WEEK 2 | Framing & Storyboard
Cinematography
- Motion picture/Film/Video is made up of many shots
- Shot: a simple basic unit of video
- Sequence is a series of scenes or shots, complete in itself.
- Scene defines the place or setting where the action is laid. A scene may
consist of a series of shots or sequences depicting a continuous event
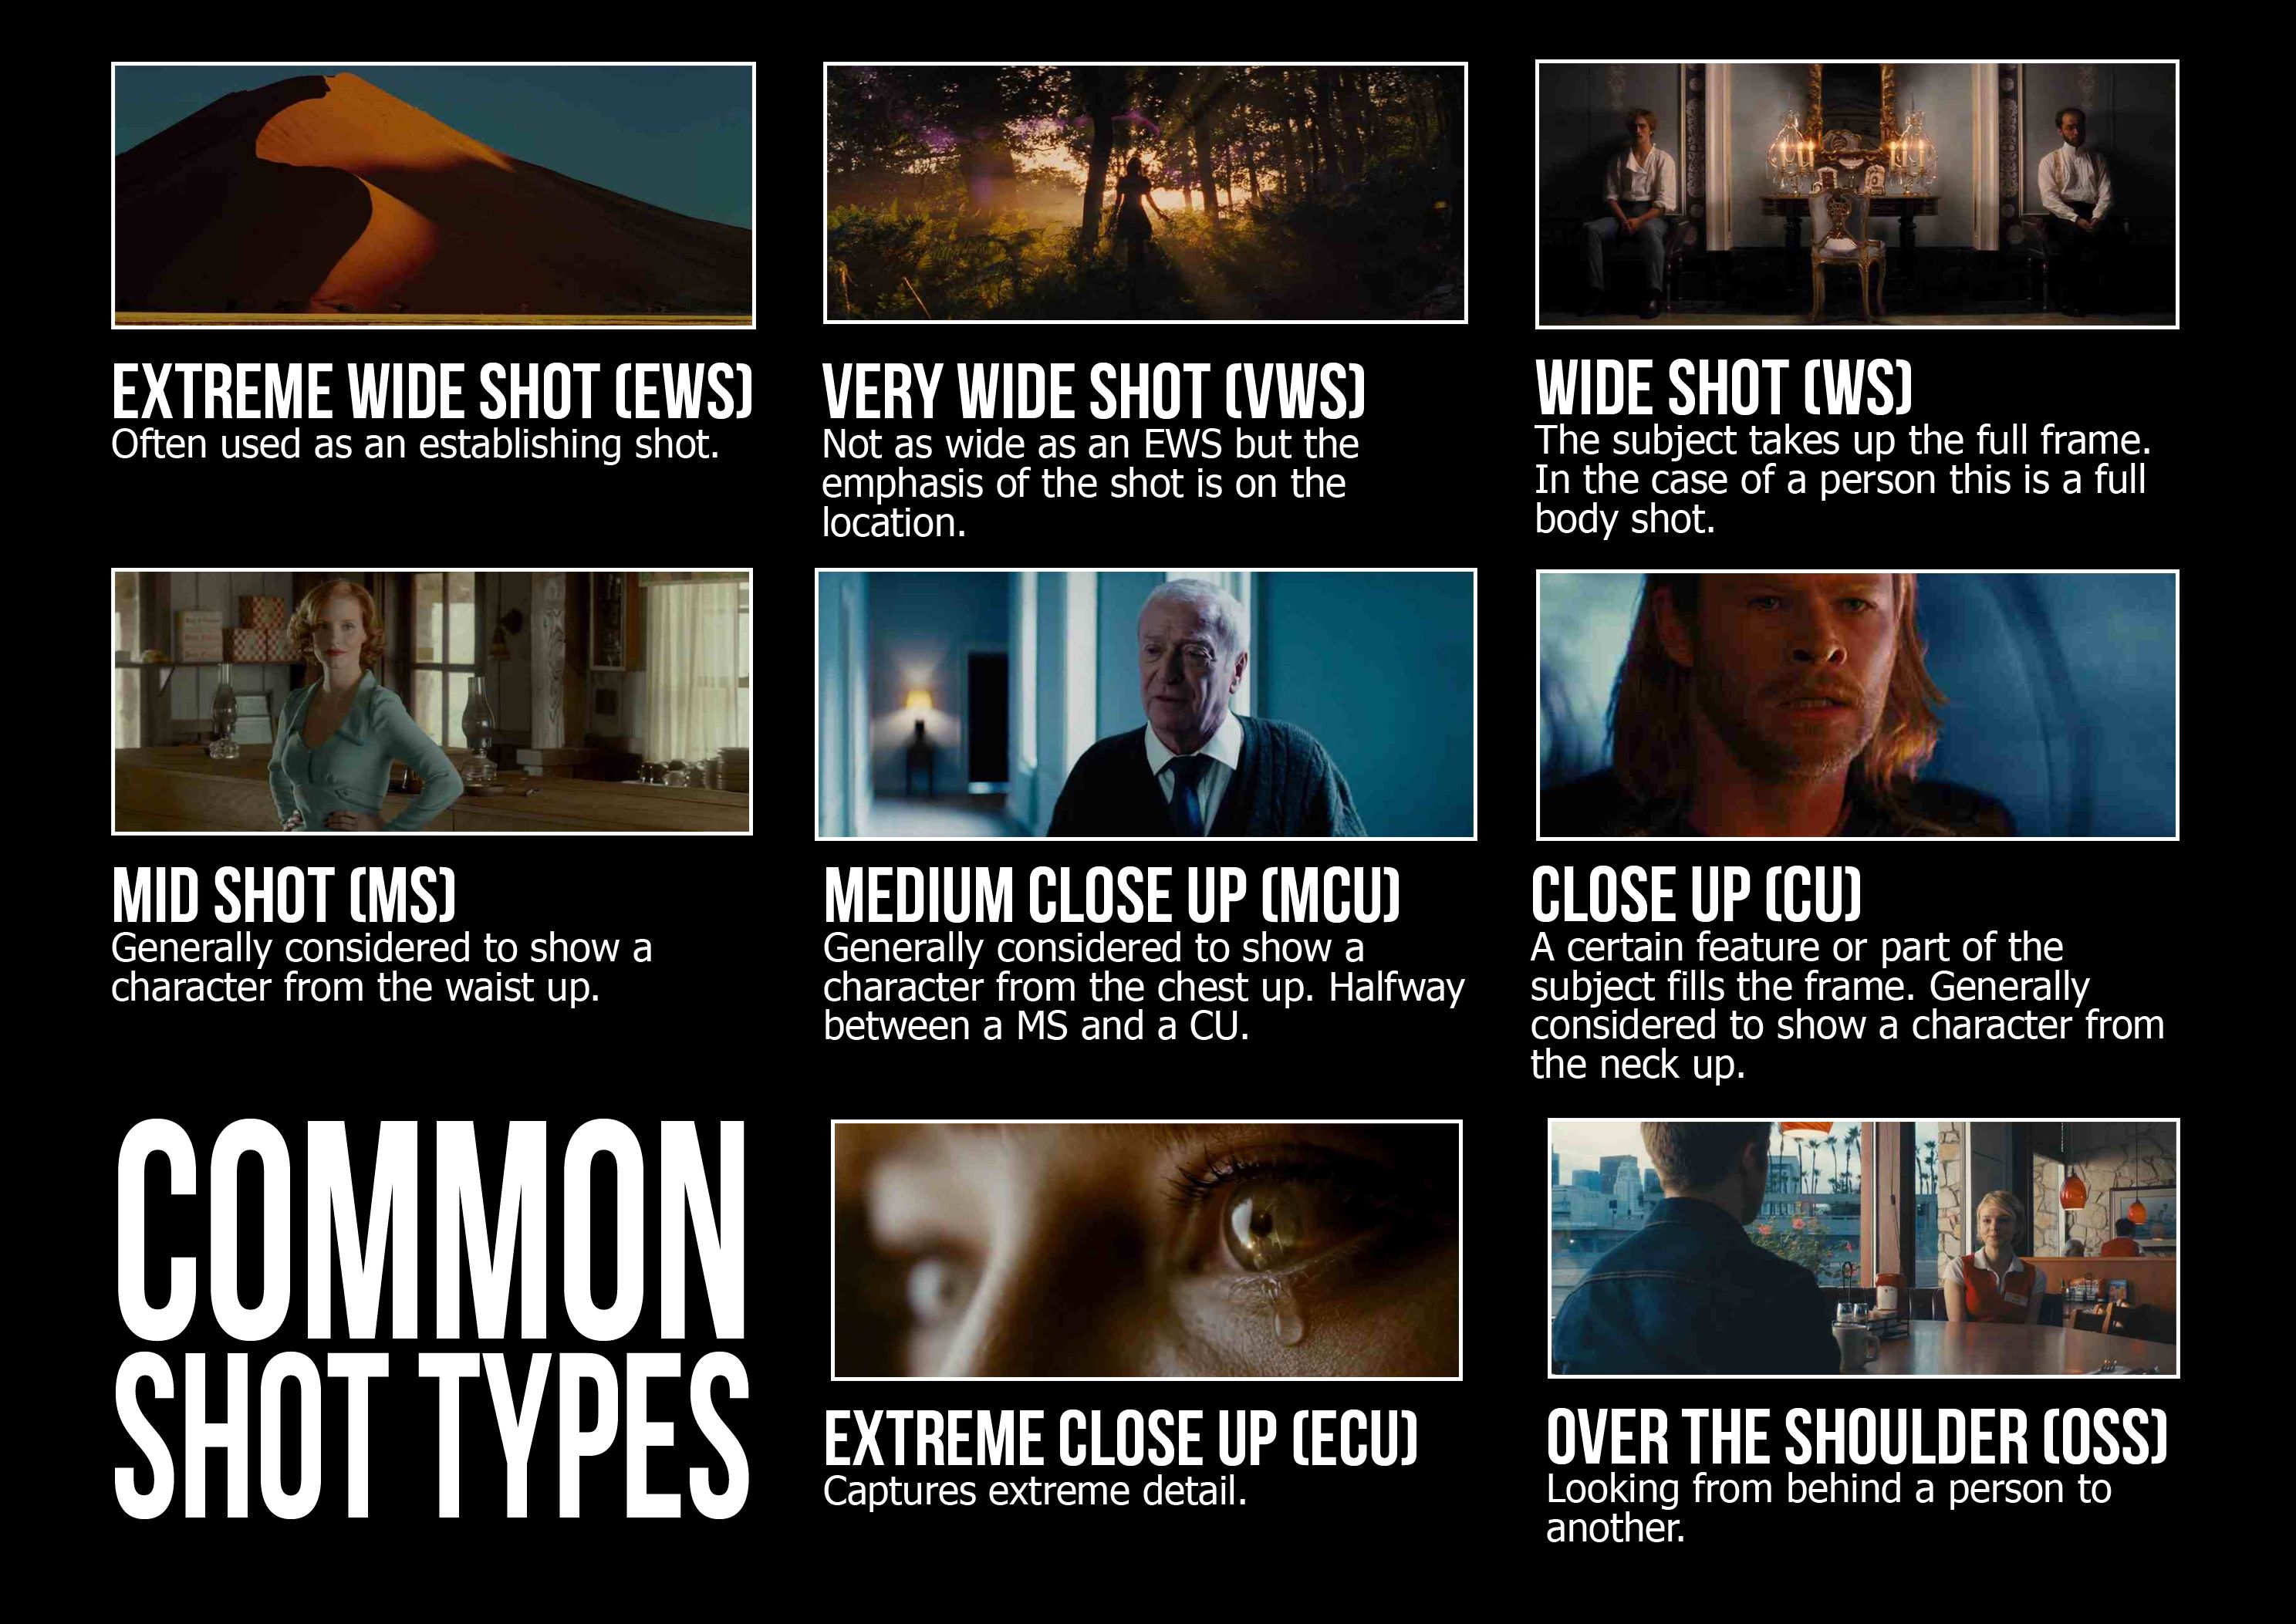
Shot sizes
1. Extreme wide shot
2. Wide shot
3. Medium wide shot
4. Medium shot
5. Medium close-up shot
6. Close-up shot
7. Extreme close-up shot
8. Over-the-shoulder shot
|
| Shot sizes (Source: Pinterest, by Anna Hawes) |
Camera Angle
Rule of thirds
Subject Angle
- Facial modelling is best when the subject is turned 45º (¾ angling) to the
camera
- When two or more surfaces are photographed together, 3 Dimensional
solidity is most evident
- Angle the camera so that parallel lines diminish and converge preferably
toward the right to ensure that the viewer’s eyes are carried into
distance.
Subject Height
- Low angle: the character looks big and strong
- Eye angle (*mostly used)
- High angle

|
| Camera angle - subject height (Source: Wix Photography) |
Screen Direction
Dynamic screen direction
- Constant screen travel depicts the subject motion in one direction only
- Have to ensure an object or a character moving in the same direction to
show progression
- Keep the camera at one side/film from the same side
Static Screen Direction
- When planning shots with two characters, you need to understand the camera
movement about the 180º rule
- The camera stays on a horizontal axis (“Line of Action”) and does not
cross sections so that it will disorient the viewer
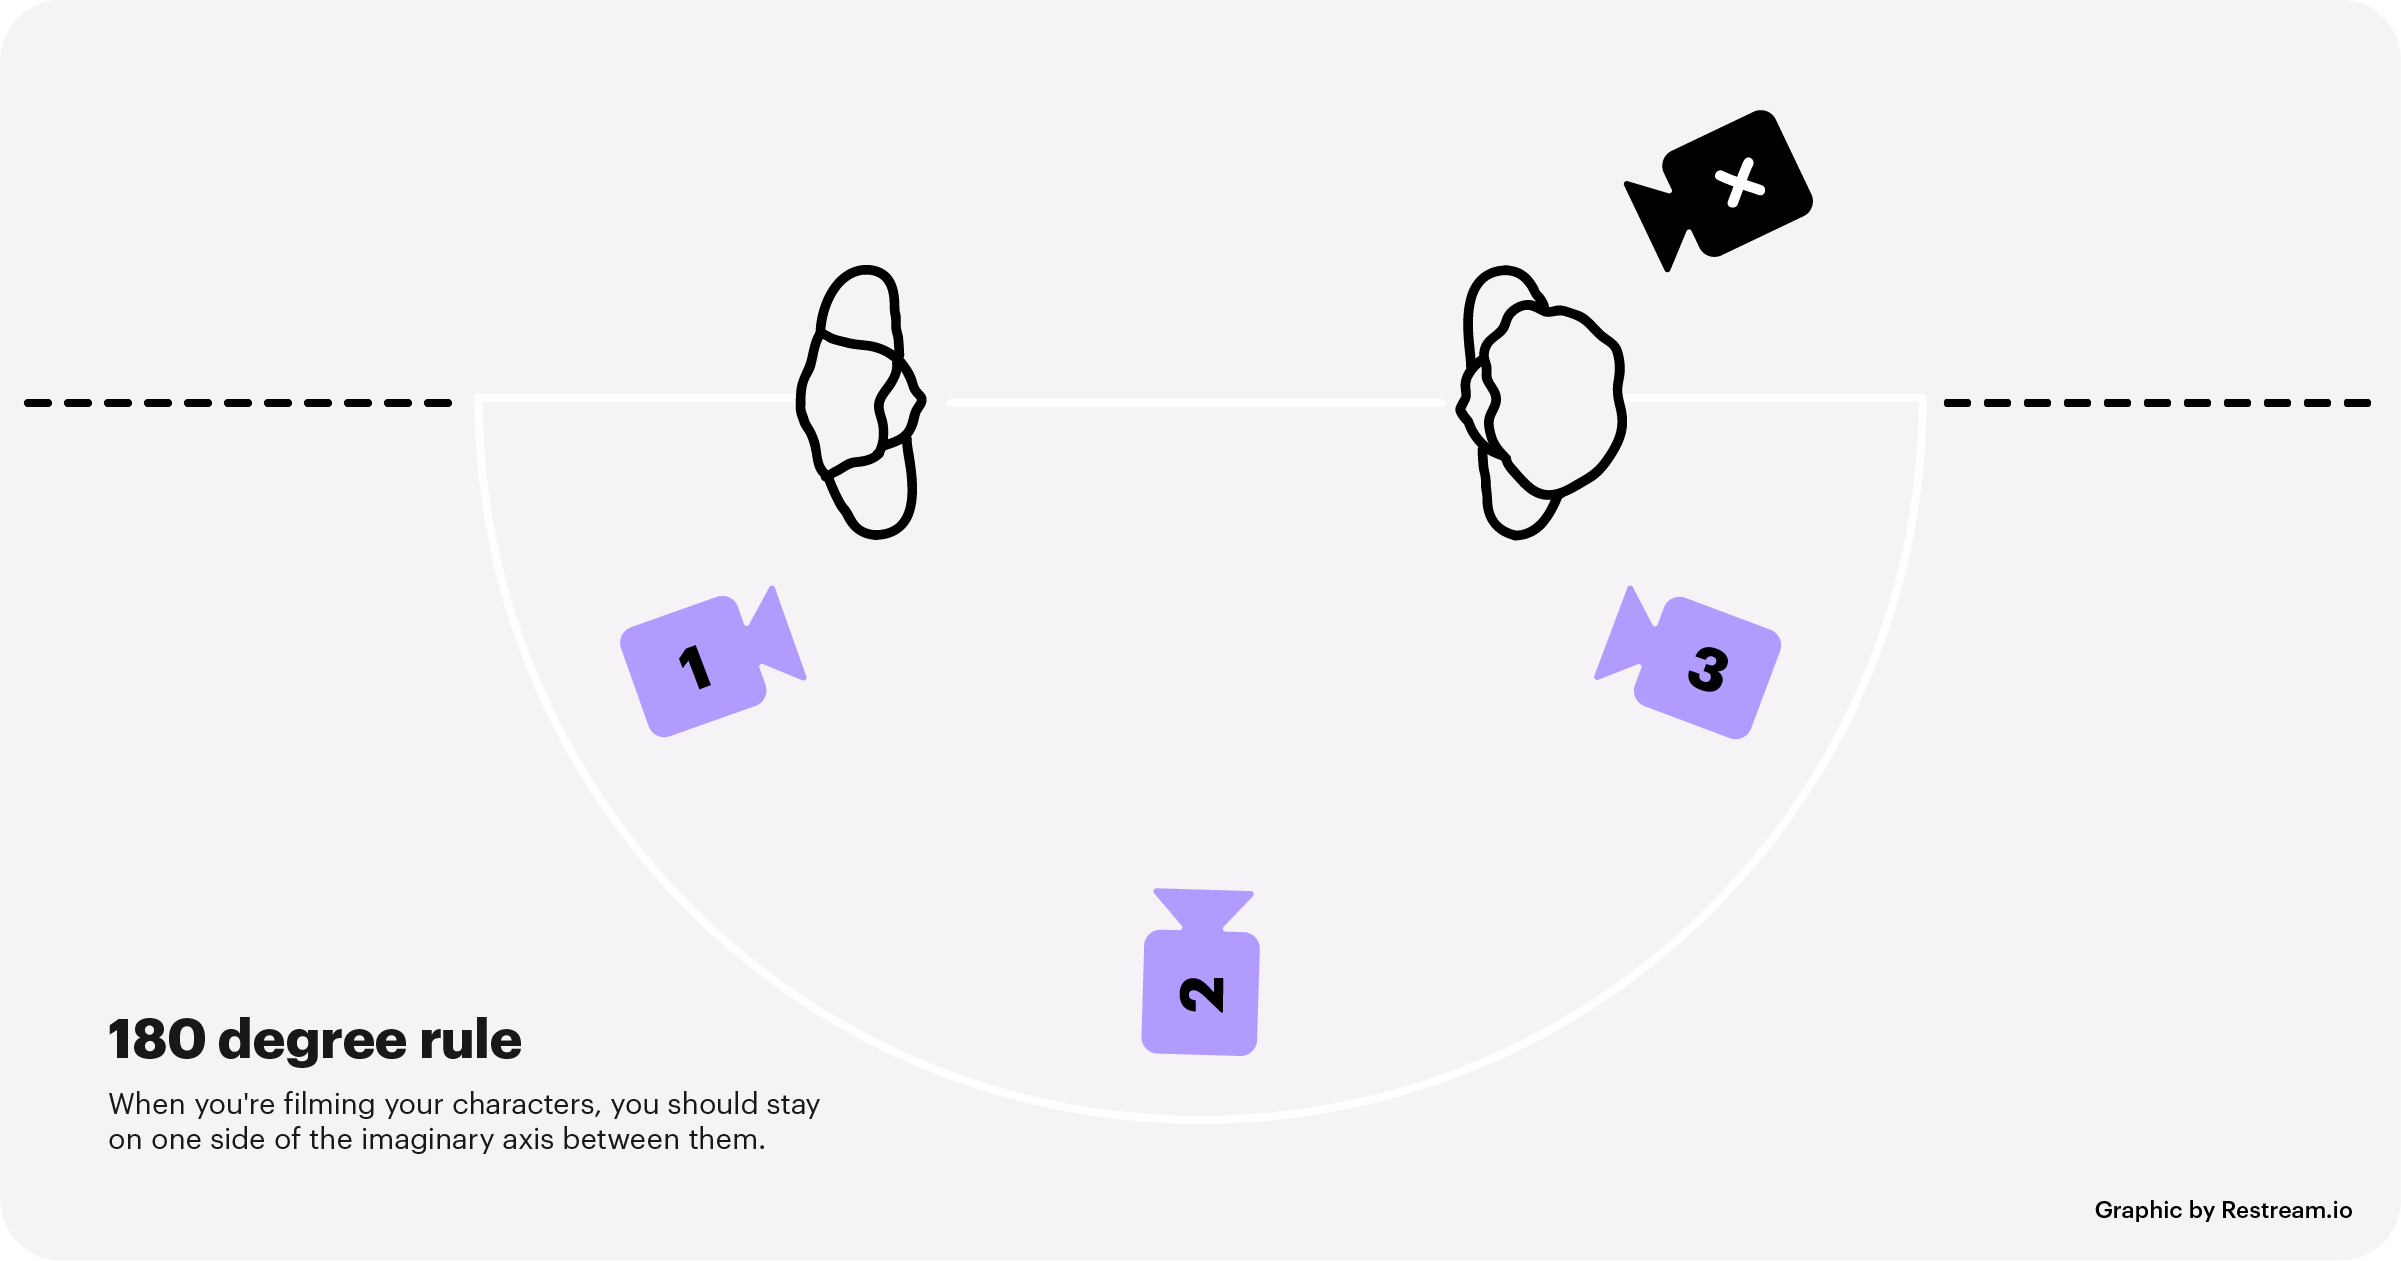
180º Degree Rule
- If Cameras 1 and 3 are used, the audience stays on one side of the line of
action. These shots are called "reverse angle shots".
- If Camera 2 and the black camera are used, the audience crosses the line of
action. It's disorienting and confusing.

|
| 180-degree rule (Source: Restream) |
WEEK 3 | Storytelling in Film
3-Act Structure

|
| 3-Act Structure (Source: Studio Binder) |
PLOT POINT 1 “The plot thickens”
- The “inciting incident”
- Turn the story in a new direction
PLOT POINT 2 “The longest mile”
- The “Climate Turning Point”
- Protagonist's quest reaches critical mass
- Possible solution is presented
- Biggest cliffhanger: will the protagonist win or lose?
ACT 1: BEGINNING
- Introduce the world, main characters
- Establish the dramatic situation
- Leads to an incident that complicates the story (PLOT POINT 1)
ACT 2: MIDDLE/CONFRONTATION
- Known as ‘Rising Action’ (Climax)
- To develop obstacles/complications, stopping the characters from achieving
what they want
- Leads to the climb of the story (PLOT POINT 2)
ACT 3: END/RESOLUTION
- Ending of climax
- Answer all obstacles/problem
- Tying the loose ends
Storytelling is about how the character overcomes challenges and weaknesses
and learns from them to become a better person.
INSTRUCTIONS
EXERCISES
WEEK 1 | Video Editing Exercises
In the following exercises, we learned to create a new project, locate files
in the same folder and combine video footage using Adobe Premiere Pro.
Notes:
- Add clip into the sequence: Insert (,), Overwrite (.)
Exercise 1: MINTS

|
| Fig. 1.1 Screenshot of locating files - MINTS, Week 1 (4/4/2023) |
Video 1: MINTS, Week 1 (4/4/2023)
Exercise 2: DORITOS

|
| Fig. 1.2 Screenshot of locating files - DORITOS, Week 1 (4/4/2023) |
Video 2: DORITOS, Week 1 (4/4/2023)
WEEK 2 | Shooting Editing Exercise: Framing & Editing Exercise: Adding Caption
Premiere Pro Editing Exercise 1
First, I trimmed each clip to get the exact part I wanted and inserted them into the sequence according to the list of shots. Next, I inserted the caption (the name of each shot) to each clip and added the Cross Dissolve effect to the captions. I also added the Cross Dissolve effect to each clip so there is a transition between the clips. Finally, I added background music to the video.
According to the editing requirement, I inserted all the clips into sequence and edited them to 35 seconds sharp.
I applied the Cross Dissolve video transition effect to the beginning of scene 1 shot 6B to make the character disappears.
For the graphics part, we have the message dialogues to insert in the clips. I created the guides to ensure that each of the message dialogues has the same size (Fig. 2.5 left). Then, I inserted the iPhone message notification to where the message dialogues pop up (Fig. 2.5 right).
Next, we learned to nest the clips into a nested sequence.
Shooting Exercise: Framing
We are divided into groups of two for the framing exercise. We are to film
our partners in different shots listed by Mr Martin as a shooting exercise.
The eight shots are as follows:
- Low-angle wide shot
- Frontal MCU (soft background)
- Frontal MS (soft background)
- Extreme close-up shot
- Side angle MS (soft background)
- 3/4 angling MCU shot (with blurry/soft background)
- CU shot
-Eye-level medium wide shot
The shots filmed by me are uploaded to Google Drive.
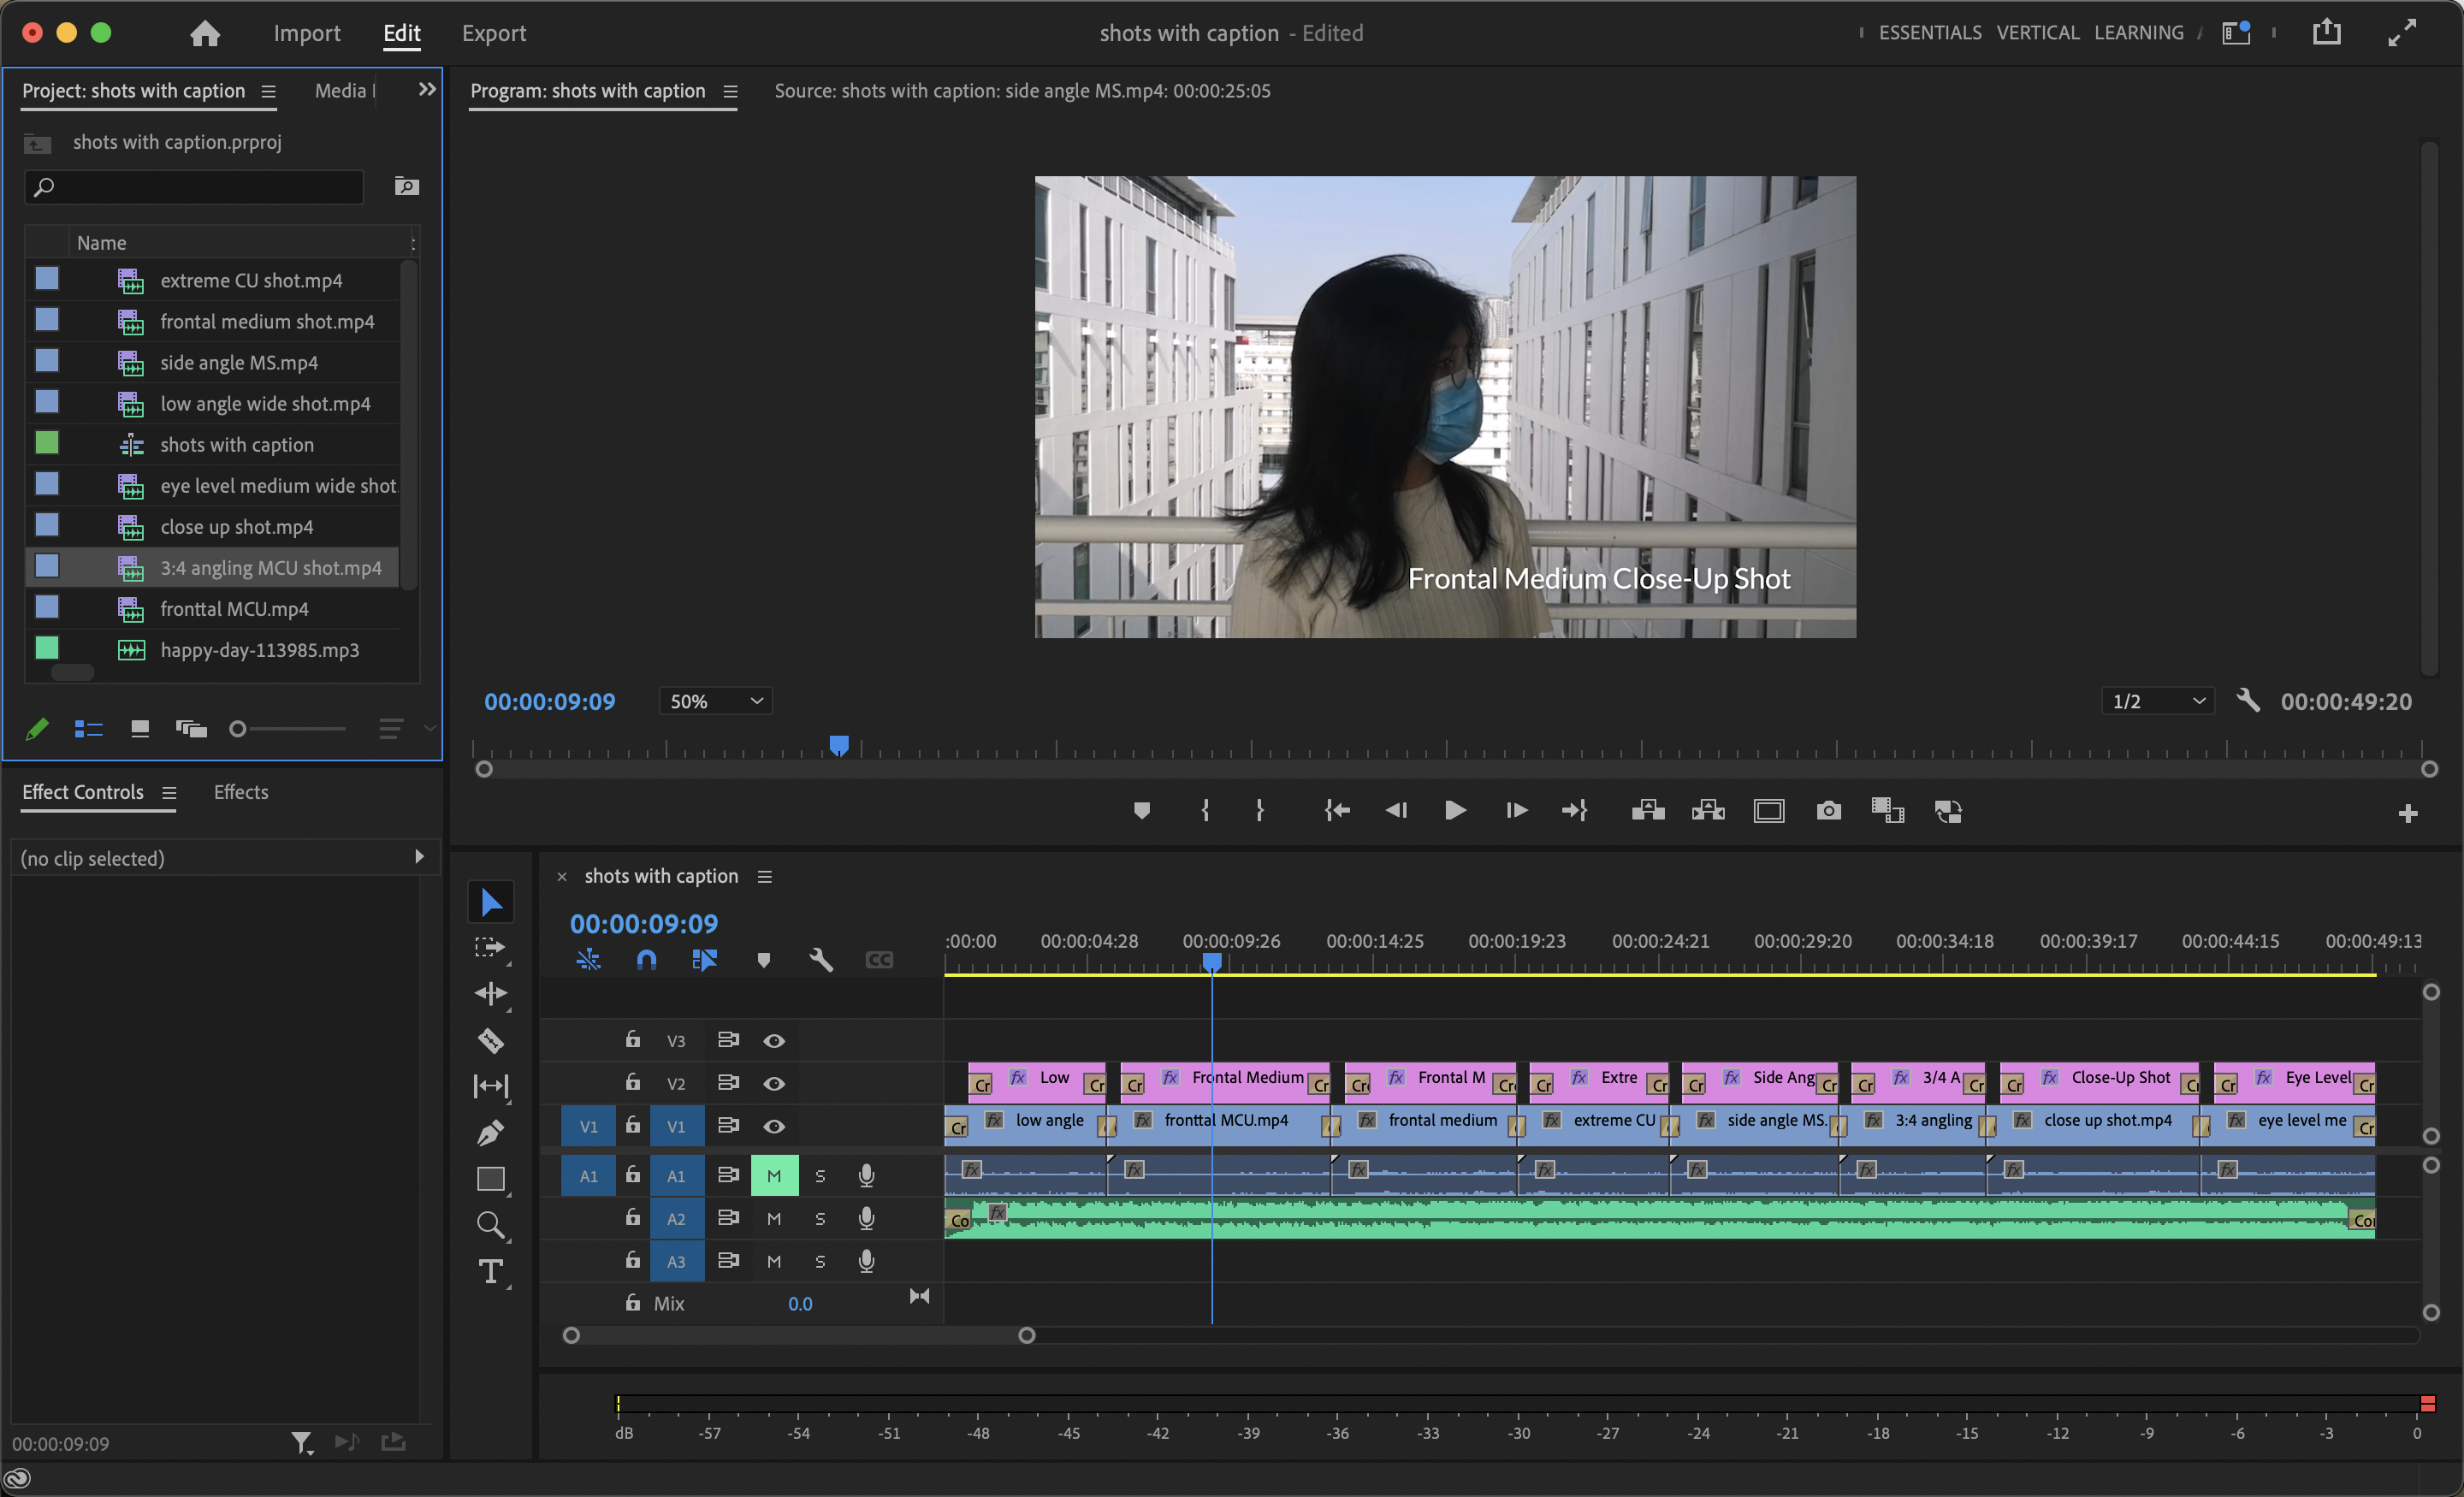
Editing Exercise: Adding Caption
Next, we are to add captions of the types of shots to the videos we have
filmed following the tutorial video (Adobe Premiere Pro CC - Basic Titles for Beginners) provided.
|
| Fig. 2.1 Timeline panel - Editing and adding captions |
First, I trimmed each clip to get the exact part I wanted and inserted them into the sequence according to the list of shots. Next, I inserted the caption (the name of each shot) to each clip and added the Cross Dissolve effect to the captions. I also added the Cross Dissolve effect to each clip so there is a transition between the clips. Finally, I added background music to the video.
Video 3: Editing Exercise: Adding Caption to the Shots
Premiere Pro Editing Exercise 1 “Lalin”
We were tasked to edit a video with provided footage filmed by our seniors
that are not finely edited according to the story of the original video
Lalin, following the
tutorial video
by Mr Martin. The duration of the final edited video should be 35 seconds
sharp.
Video 4: Original video -
Lalin
Notes:
- Use the Editing workspace
- Trim footage: Mark in (I), Mark out (O)
- To make the character disappears (Scene 1 shot 6A & 6B): Shorten
shot 6B → overwrite shot 6A → apply the Cross Dissolve effect
I watched the video clips first and renamed them according to their
scenes, shots and takes so I could arrange them into the sequence based on
the storyboard.

|
| Fig. 2.2 Renaming each video clip, Week 2 (17/4/2023) |
According to the editing requirement, I inserted all the clips into sequence and edited them to 35 seconds sharp.

|
| Fig. 2.3 Editing video clips to 35 seconds, Week 2 (17/4/2023) |
I applied the Cross Dissolve video transition effect to the beginning of scene 1 shot 6B to make the character disappears.

|
| Fig. 2.4 Cross Dissolve video transition effect (scene 1 shot 6A & 6B), Week 2 (17/4/2023) |
For the graphics part, we have the message dialogues to insert in the clips. I created the guides to ensure that each of the message dialogues has the same size (Fig. 2.5 left). Then, I inserted the iPhone message notification to where the message dialogues pop up (Fig. 2.5 right).

|
| Fig. 2.5 left: Adjust the size of message dialogues; right: Inserting message notification, Week 2 (17/4/2023) |
Lastly, I applied an adjustment layer as a filter to the video clips for
better video outcomes. I also inserted background music into the audio
track.

|
| Fig. 2.6 Timeline panel overview, Week 2 (17/4/2023) |
Video 5: Final outcome of Premiere Pro Editing Exercise 1 “Lalin”
Original Video Clip (by Taylor's University student)
https://youtu.be/o5ryGqCv3A0
BGM: nomaBeats - sakura https://pixabay.com/music/modern-classical-sakura-141497/
WEEK 3 | 3-Act Structure Exercises
We are to analyse two short films based on the 3-Act Structure by filling
in the worksheet provided by Mr Martin.
Exercise 1: Guang (2011)
Guang tells the story of an autistic young man with a hidden musical
talent who struggles to find a job and his relationship with his brother.
Video 6: Guang
(2005)
Exercise 2: Lalin (2005)
Lalin' is a Thai girl living in Sapporo, Japan; where no one knows her
and can live under a new identity. Posing as a modern beauty, she
becomes an idol on the internet. The reality is that Lalin hiding from
the world and striving for self-acceptance.
Fig. 3.1 3-Act Structure Exercise - PDF, Week 3 (24/4/2023)
WEEK 4 | Colour Correction
Before we head into the colour correction exercise in Premiere Pro, we
have to know what colour correction and colour grading is. We were told
to ask ChatGPT the following questions:
1. What is colour correction?
2. What is colour grading?
3. What are the differences between colour correction and colour
grading?
4. Are both colour correction and colour grading necessary while editing
videos? Or just do one of them?
Then, we are to verify ChatGPT’s answer with Google and summarise the
answer. We are advised to paraphrase the answer from ChatGPT and Google
in which both sources are just references for us to get the idea of
colour correction.
Fig. 4.1 Colour Correction - Answers from ChatGPT and Google - PDF, Week
4 (25/4/2023)
Summarised answer:
1. Colour correction involves correcting the colour of a video or film,
which includes adjusting contrast, exposure, white balance, and black
levels. The purpose is to ensure that all footage in the project has the
same colour tone.
2. Colour grading focuses on adding stylistic effects to the video or
film. This includes applying filters and adjustments to enhance the
overall look and feel.
3. Colour correction and colour grading use different methods and serve
distinct purposes. Colour correction aims to adjust contrast, exposure,
and other elements to match the colour tone of all footage, while colour
grading enhances the stylistic look of the film through filters and
adjustments.
4. While editing videos, colour correction and colour grading are not
strictly necessary. However, colour correction becomes essential when
the colour tone of the footage is different, and colour grading is
applied when a specific stylistic look is desired to enhance the final
outcome of the video.
Colour Correction Exercise in Adobe Premiere Pro
Colour Correction
Colour Correction
- Use Color editing workspace
- Open the Lumetri Scopes window to select Parade RGB and Waveform Luma
- Adjust white balance, temperature, tint, saturation, exposure,
contrast, highlights, shadows, whites and blacks under the Basic
Correction section in the Lumetri Color panel
Colour Grading
- Add a new adjustment layer to the Project panel
- Drag the adjustment layer into a new video track
- Play around with the adjustments under the Lumetri Color panel to get
the desired look or mood
Notes:
- Workspace: Effects
- Turn on comparison mode and the Lumetri Scopes window
- Lumtri Scopes: Parade (RGB); Waveform (Luma)
In the process of colour correction, I used clip 3 as the reference for
the other two clips. I made adjustments to things such as exposure,
highlights, shadows, contrast, and other relevant settings to ensure
that the two clips match the same colour tone as clip 3.

|
| Fig. 4.2 Clip 3 as the colour correction reference, Week (25/4/2023) |

|
| Fig. 4.3 Colour correction on clip 1, Week 4 (25/4/2023) |

|
| Fig. 4.4 Colour correction on clip 2, Week 4 (25/4/2023) |
Video 8: Colour correction outcome, Week 4 (25/4/2023)
For colour grading, I applied the preset of SL GOLD TOBACCO under the
Creative section and adjusted its intensity, vibrance and
saturation.

|
|
Fig. 4.5 Colour grading, Week 4 (25/4/2023) |
Video 9: Colour grading outcome, Week 4 (25/4/2023)
Video clips provided by Mr Martin
WEEK 9 - WEEK 10 | Stop Motion
Filming Practical
During week 9, we had our class in the Photography Studio. We learned to
film stop motion videos using a DSLR camera and mobile camera as an
exercise and practical for our final project.
DSLR camera
To film using a DSLR camera, it is important to set the image format
from RAW file to JPEG file. Besides, Mr Martin guided us with setting up
the lightning.
View the filmed clips in Google Drive.
Mobile camera
Video 10: Stop motion video outcome (film with mobile camera)
Stop Motion Editing
In the week 10 class, we learned to edit stop motion videos using Adobe
Premiere Pro. Mr Martin guided us to insert the clips into the sequence
and adjust the sequence settings.

|
| Fig. 5.1 Insert clips into the sequence, Week 10 (6/6/2023) |

|
| Fig. 5.2 Setting up sequence settings, Week 10 (6/6/2023) |
Next, we learned to nest the clips into a nested sequence.

|
| Fig. 5.3 Nesting clips, Week 10 (6/6/2023) |
Below is the first attempt at editing the stop motion video. The outcome
was unsatisfying regarding the displacement and the difference in the
colour tone.
Video 11: Stop motion video attempt #1 (film with DSLR camera)
Thus, I adjusted the clips to let the objects remain in the same
position using nested sequences. Besides, I applied an adjustment
layer to enhance the overall looking of the stop motion video.

|
|
Fig. 5.4 Adjusting position using nested sequence, Week 10
(6/6/2023) |
Video 12: Final edited stop motion video (film with DSLR
camera)


Comments
Post a Comment